The "Battle at Alresford Creek" was our first foray into the world of the new SAGA rules. Being unfamiliar with the rules we decided on a simple '4 point' per side battle with Anglo-Danes facing a raiding Viking force.
The quiet village of Alresford.
I received my copy of SAGA only a few days before and had not read as far as fatigue so a little catching up started us off. We were here to learn and critique the system so expected to take it slowly. Game play commenced around 1pm.

An ogre appears to be lost...
As the subject comes up a few times in the text below I'll explain about the dice here. Each cultural group has its own unique abilities which become available turn by turn based on the roll and placing of a set of special dice. The dice are six sided with three sides to the value 'c', two to the value of 'b' and one to the value of 'a'. Thus the rarer value 'a' tends to be required for the harder or less frequent abilities. The Anglo-Danish forces dice use a Sutton Hoo style helmet to represent value 'a', then a stylised white horse and Dane Axe head for 'b' and 'c' respectively. The Vikings use the runes for sun, birch and wealth as 'a', 'b' and 'c'.

A village elder looks on.
Forces
Viking Raiders (Mark)
Jarl Ragnar
1 unit of Hirdmen (4 x Hearthguard)
1 unit of Beserkers (4 x Hearthguard)
1 unit of Bondi (8 x Warriors)
1 unit of Thrall (12 x Levy)
Anglo-Danish Defenders (Robert)
Ealdorman Aescwulf
1 unit of Huscarl (4 x Hearthguard)
1 unit of Dane-axe wielding Huscarl (4 x Hearthguard)
1 unit of Ceorl (8 x Warriors)
1 unit of Gebur (12 x Levy)

The Anglo-Danish warband of Ealdorman Aescwulf.
I took the Anglo-Danish against Marks Vikings, we decide to both play the same, two hearthguard (one with and one without the specialty, that's berserkers for the Vikings and Dane-axe wielders for the Anglo-Danish / Saxons) plus one warrior and one levy unit giving us 4 points each. We were playing the ford / bridge crossing scenario from the rules which simply required us to get more points of troops across the river than our opponent.

The Viking warband of Jarl Ragnar.
Mark maintained his unit sizes as given (5 dice) but I decided to test out splitting them by cutting my warriors into two (and thus giving me an extra dice over Mark) but also splitting my levy so that I could provide missile cover at both crossings (levies not providing dice meant that this left me with 6 dice and 6 units against Marks 5 dice for 4 units). Possibly not sensible but it would test the rules of command which is of course what the dice represent.
Placing
The Vikings placed first (to the right in the picture below) and entered down two roads with warriors (bondi) followed by berserkers to the north (top) and warlord, hearthguard (hirdmen) and levy to the south. The Angles brought in 4 warriors (ceorls) and 6 levy to the north (I only wanted to provide a delaying cover action here) 4 warriors, standard huscarls (hearthguard) and 6 levies to the south to provide a good push and in reserve the warlord and Dane-axes in the centre in front of the church.

Initial warband placement.
Turn 1
Anglo-Danish
Angles moved forward first. My first roll of dice heralded a constant problem in the form of a lack of helmets (I was to naturally roll only three helmets in the entire game, see note latter). Not really a problem this turn, all I wanted to do was get my troops up a quickly as possible, easily done getting my entire force to within striking distance of their intended locations.

The view from the Viking side of the river.
Viking
The Vikings followed suit. As can be seen in the next picture below, which was after my second move but before Marks he has seriously hampered his own success by blocking the berserkers with his warriors something I was able to take advantage of in the next two rounds.
Turn 2
Anglo-Danish
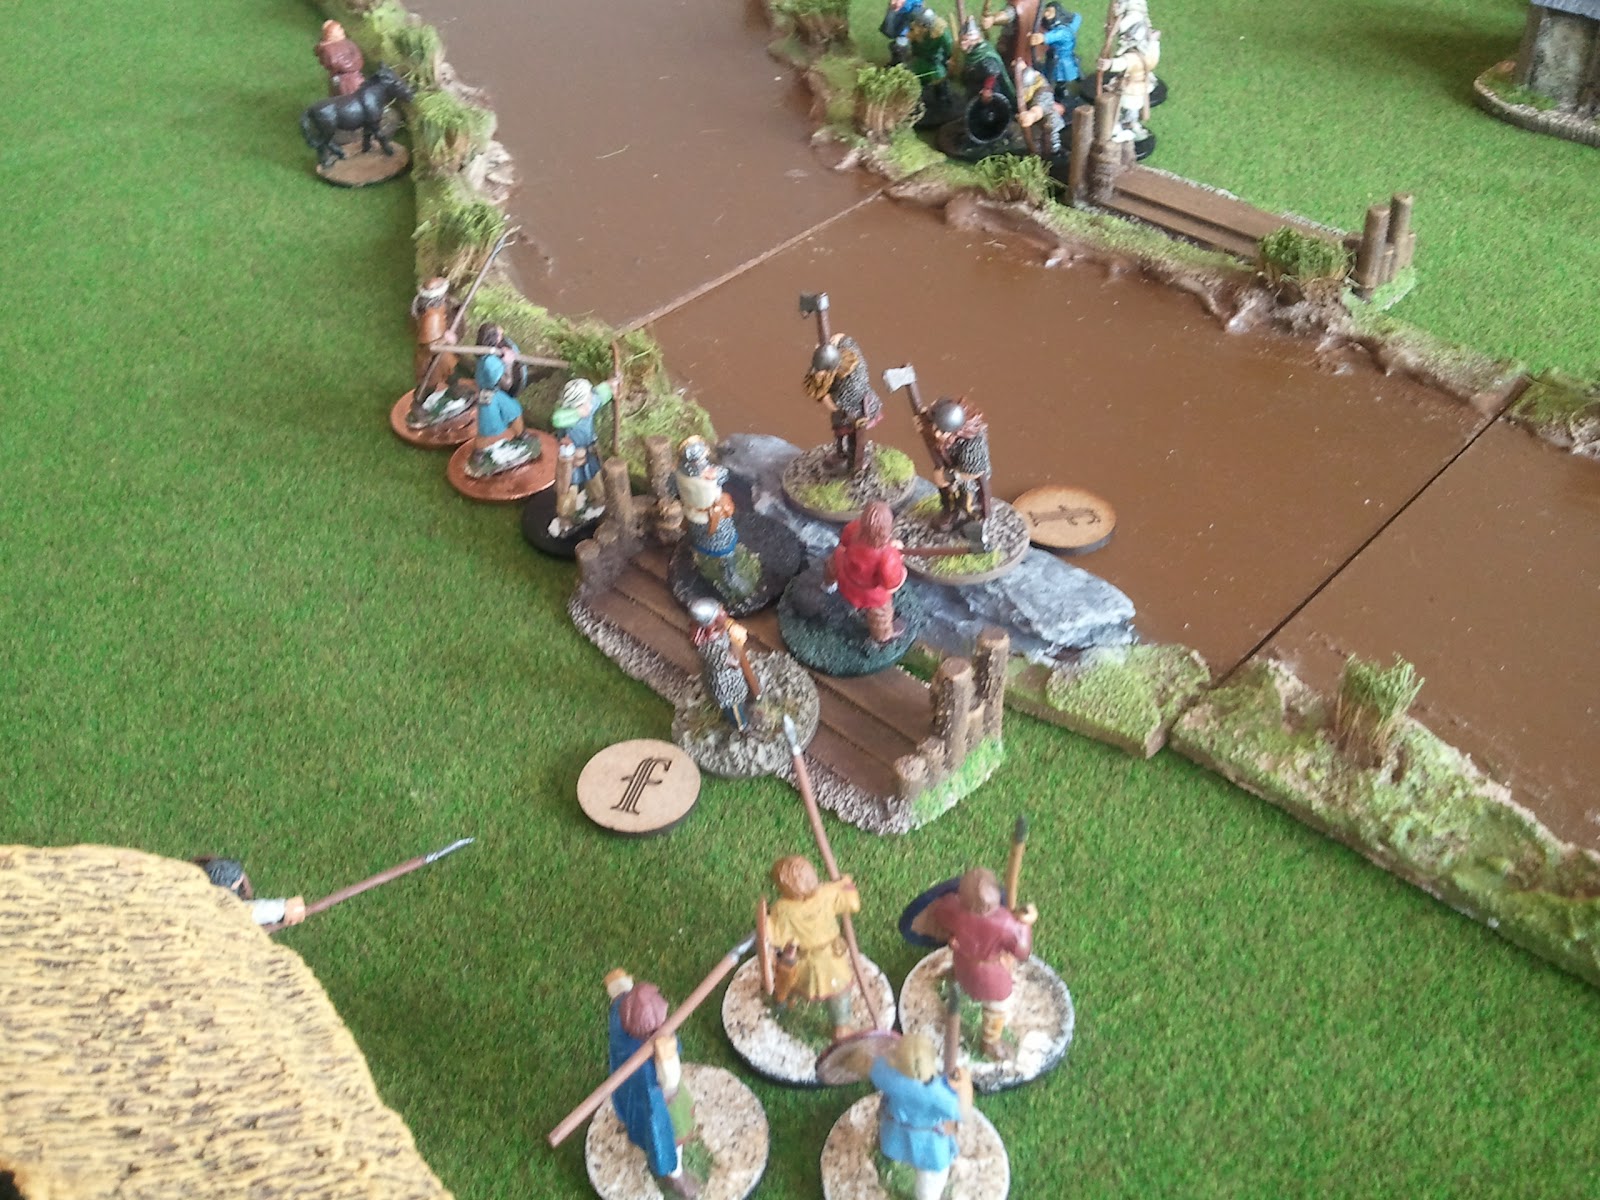
In the north following my delay strategy the warriors entered but did not cross the bridge while the levies lined up to cover the expected attack. In the south the hearthguard strike out across the ford with warriors supporting their rear and levies to provide cover.

First moves over the river.
Viking
The Viking movement saw tragedy played out in full among the Norse lines. The warlord racing for forward outpaced the supporting hearthguard who could not quite make the ford, charged the forces gathered there on his own. The resultant bloody fray saw him come so close to completely wiping out the Angles but not quite however, in turn falling to their hail of blows (five hits only one saved even with the special rules four clean wounds kill even a warlord).
The Viking movement saw tragedy played out in full among the Norse lines. The warlord racing for forward outpaced the supporting hearthguard who could not quite make the ford, charged the forces gathered there on his own. The resultant bloody fray saw him come so close to completely wiping out the Angles but not quite however, in turn falling to their hail of blows (five hits only one saved even with the special rules four clean wounds kill even a warlord).

The first and last battle of Jarl Ragnar.
The shock of the slaughter caused fatigue on both the Viking hearthguard and levy both in short range of the warlord demise. It also lost Mark two dice meaning he played the rest of the game on 3 dice.

The huscarl survives!
Back in the north the bridge attacking warriors roared their defiance and the threat of a (small) hail of arrows caused 'Intimidation' (Anglo-Danish ability stopping the Viking activation) to the Norse warriors who held their position, still blocking the berserkers behind.
Turn 3
Anglo-Danish
The Angles move. The lone huscarl retreats but lack of available dice stop the warriors letting him through (they need to be removed from the ford as he cannot pass through the unit or else form a column to walk beside, not a good formation to receive an attack in) . The levies covered him firing into the enemy hearthguard for no real effect. On the bridge the gebur (Saxon levies) did rather better taking out two of the warriors with good Anglish bowmanship as they nervously approaching the other side. The warlord and the reserve huscarl seeing the weakened enemy position at the ford move across from their central location to take advantage.
Viking
The Vikings send a hail of arrows into the southern Saxon Levy killing two. This could be seen as a tactical error as had Mark fired on and killed my lone hearthguard he would have both denied me a dice and put fatigue onto both the warriors and the levy which were in very short range of him. Although to be fair I think he was expecting the hearthguard to cross the river and deal with that figure but unfortunately they had received a fatigue as a result of the warlords demise and I used that to slow their advance (reduce movement to half) letting him get clean away in my next activation phase. It was also a reversal on Marks original intention which was to fire on the incoming warlord and his Dane Axes, which he had second thoughts on when he realised the difficulty in actually hurting them. In the north more Intimidation keeps the Viking warriors at bay.
Turn 4
Anglo-Danish
The Angle turn saw the warlord and his unit close on the ford as the warriors retreat to allow the lone huscarl back across supported by levy fire which reduced the Viking thralls (levy) by two. While at the bridge another hail of arrows drops a third warrior (all hail the mighty bow).
Viking
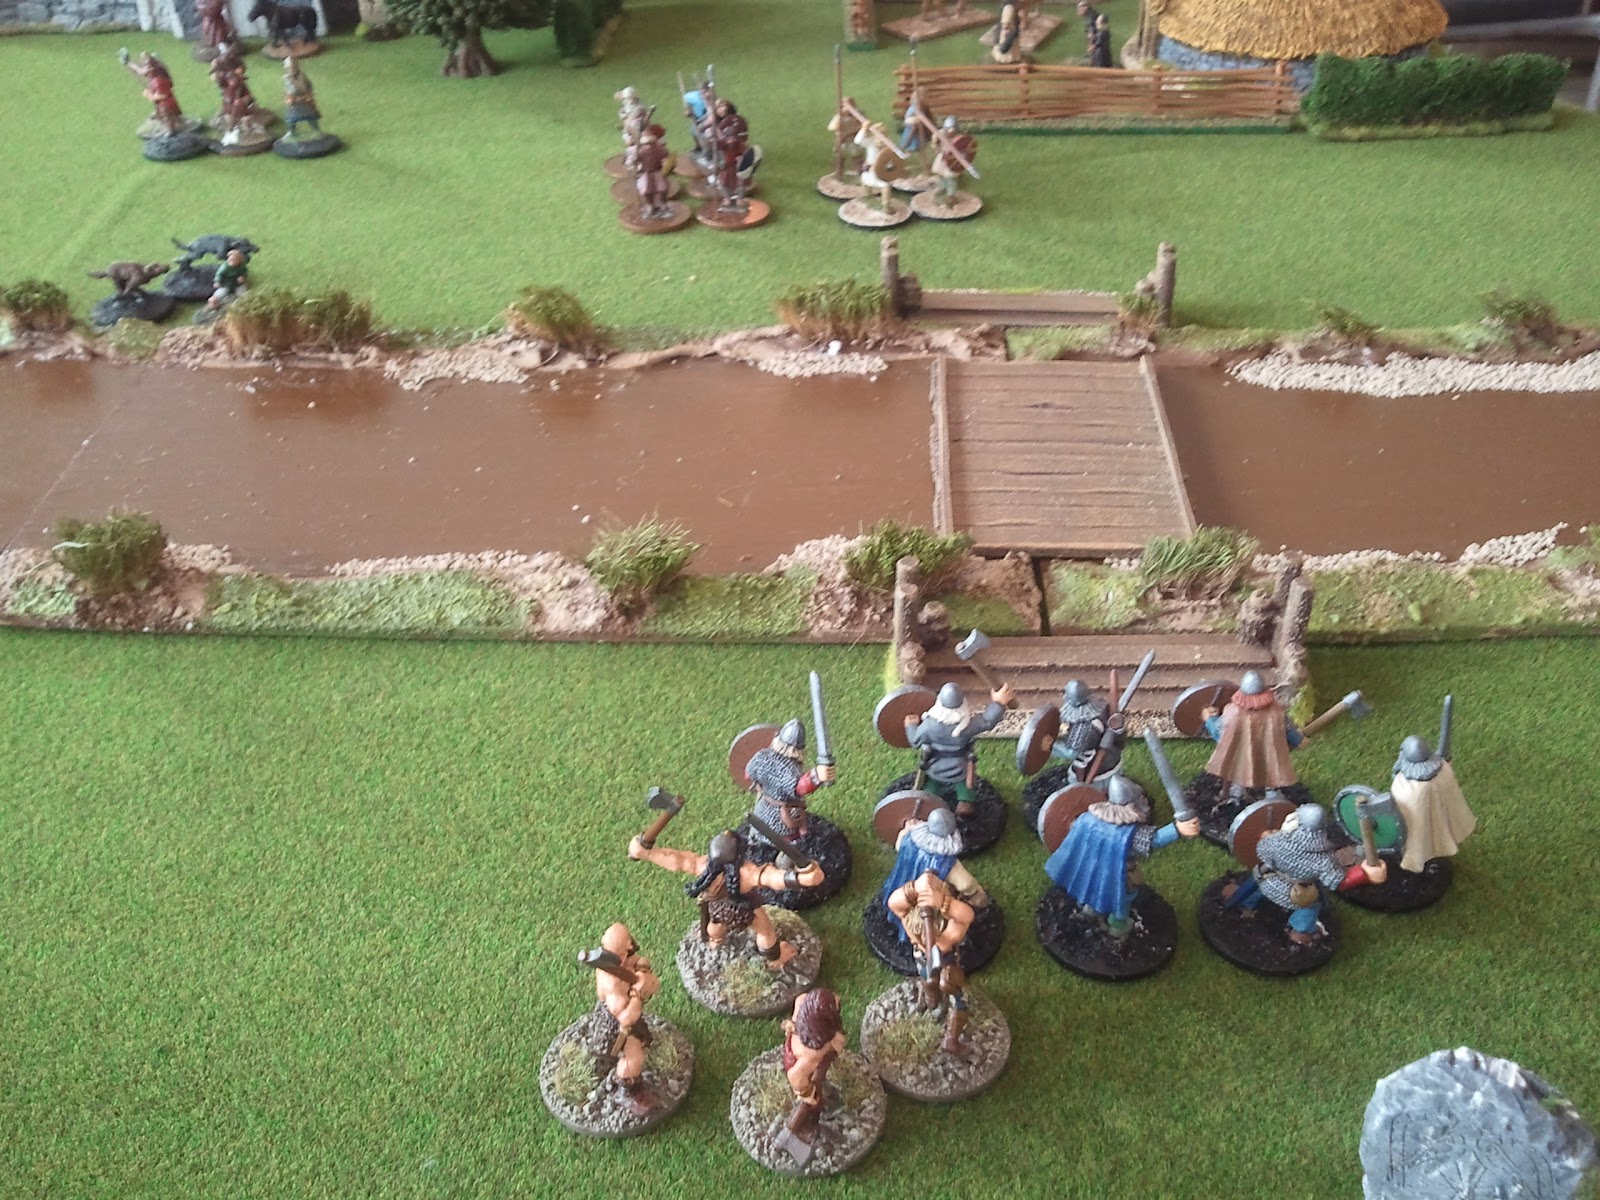
In the north Marks warriors (now reduced to five from eight) finally mount the bridge and charge the awaiting Anglo-Danish ceorls. Although only two could contact the very short range combat rule allowed both sides second ranks to fight so the Norse charged with four, before abilities even dice. He then played Heimdal to improve that by three more dice at an armour penalty but negated that by using the Asgard ability. The Angles valiantly held up but under that barrage still lost a man while the Norse saved all their received hits. The Angles disengaged.

Battle at the bridge.
At the ford the hirdmen reach the Angle bank but are not keen to leave the water and be surrounded by Angle units (warriors, the lone survivor huscarl and the warlord arriving with his Dane-axed huscarls).
Turn 5
Anglo-Danish
Realising that the Vikings would not venture out of the ford where they would be surrounded and not wanting to risk making the warlord a single target (remembering the Vikings losing their warlord in turn one and that the rules only allow a unit to attack one unit and the warlord even side by side counts as a separate unit) I move the Dane-axed huscarls up to the ford edge to block the hirdmen (not having enough range to contact). Bad move - I should have held them on the ford until I was ready to attack and used the warlord 'side by side' rules. The gebur take out a few more thrall. The Angles in the north re-attack the bondi on the bridge but a draw was held and the attacking force had to disengage.

Ceorls repelled.
Viking
In the north the Viking bondi recharge across the bridge this time saving all their throws while the Angles saved only one. We both forgot to use the fatigue until too late but the results would have been the same. This meant both units would go into the next round with two fatigue each.

Fatigue accumulates quickly.
At the ford the hirdmen attack. The Dane-axes hit true killing a hirdman but the armour of the hirdmen (Dane-axe armed men lose a armour level to gain a +1 to hit) makes the difference with two huscarls falling. They fall back ready for the Angles turn.

The Anglo-Danish warlord - Ealdorman Aescwulf.
Turn 6
Anglo-Danish
In the north things had come together with two helmets rolled on the Anglo-Danish dice allowing an 'activation pool' roll to increase dice. 'Noble Linage' was then used to change an axe dice into another helmet which combined with the already rolled second helmet allowed the ability 'Trapped' giving a fatigue point to each of three Viking units. One went to the hearthguard and another to the levies in the south while in the north one was placed on the warriors crossing the bridge. These warriors already had a fatigue when they entered the previous combat and a second from that contact and now received a third making the unit exhausted. This allowed me to play the ability 'Exhaustion' which removed two of the figures reducing the unit to three.

The bondi face exhaustion.
In the south the Angle warlord and two Dane-axed huscarls charge the hirdmen cutting them down to a single man.

The last surviving hirdman pushed back.
Then dusk fell across the battlefield...

...and night fell.
...well time ran out anyway. We were half way through the turn with Mark still to move. The victory conditions where the number of victory points on the opponents bank. Had we played out another turn (making it the full seven turns stated in the scenario) chances are that I may have been able to cross more points to the far bank than Mark, however if he had been able to complete this turn (6) and even without another turn he would most likely (Intimidation and other factors not considered) have reached dry land with his three warriors. As such we agree that he could claim a marginal victory, woe the Angle village.
I really enjoyed this game. The combination of dice and board not only gave each side a unique flavour to their offensive style it also stopped the armies being reducing to one tried and tested trick as however good a combination of abilities where the unpredictability of the dice neatly circumvented repetition. I had a couple of really bad dice rolls including the already mentioned only three helmets (value 'a' as detailed at the start) rolled in the entire game yet I could not ever say that the dice lost me the game, they may have lost me an encounter but the next one would be totally different. Mark actually lost nearly half his dice in the first turn yet through good use of the dice managed to keep his troops constantly moving forward. It made it harder but never impossible.
The twin ford crossing scenario is a common one and I have played it may times in various periods and at various levels and it so often has been reduced to a dice contest between whichever units were able to reach the targets first. This game never fell into that trap. The use of the board and the novel use of fatigue meant that every single encounter was different, not only different but that there was a constant ebb and flow of movement and reappraisal of the tactical position that kept both parties alert and actively involved even when not their turn.
The term fatigue suggests a slowing down and sluggishness in the game as forces wear down. Not so here in reverse the fatigue rules keep the game fluid. It is this even over the boards that really makes the games lively. With the ability of the enemy player to use your fatigue against you the player must constantly weigh the pros and cons of keeping or losing fatigue. It becomes a real danger but in a way that does not slow the game in the slightest, indeed it adds an even more exciting level to the strategy.
For a first play I found it very easy to grasp but with a great potential in skilled use. The game was never reduced to who had the better dice luck but on who took most advantage of the rolls provided. There was always an alternative you just had to recognise it. I mention as I played some of the mistakes made on both sides, mainly these are player errors and it is the players not the dice that will dictate the winners in this game. I for one am hooked.
Robert playing against Mark on the 30th March 2012.